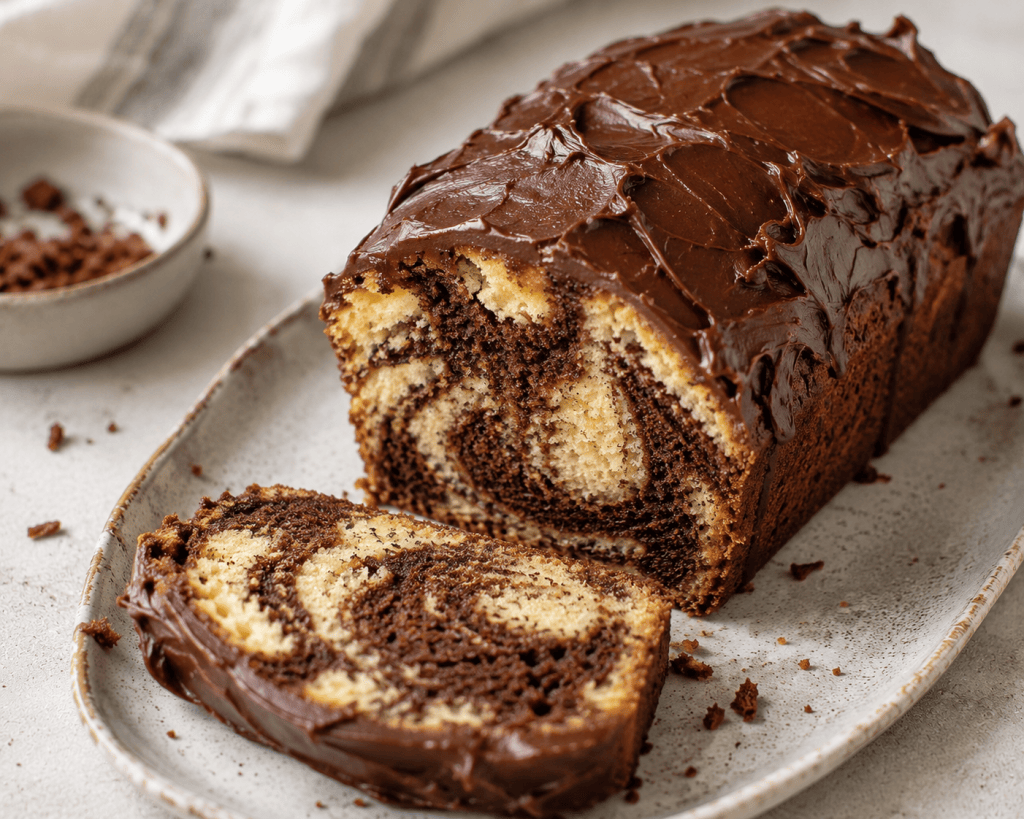
This Chocolate Marble Loaf Cake is soft, buttery, and beautifully swirled with vanilla and chocolate batter, then finished with a thick layer of homemade chocolate frosting. Every slice has a different marble pattern, giving this simple loaf cake a beautiful homemade look.
It’s an easy everyday cake made with simple ingredients and no complicated technique. Perfect with coffee, for an afternoon treat, or whenever you want an easy chocolate and vanilla dessert.
Why You’ll Love This Recipe
- Soft and moist without being heavy.
- Beautiful chocolate and vanilla swirls in every slice.
- Easy batter made from everyday ingredients.
- Rich chocolate frosting that stays soft and creamy.
- No special decorating skills needed.
- The imperfect swirls and rustic frosting make it look beautifully homemade.
Recipe Information
Prep Time: 20 minutes
Bake Time: 50–60 minutes
Cooling Time: 1 hour
Total Time: About 2 hours 15 minutes
Servings: 10 slices
Course: Dessert
Cuisine: American
Ingredients
For the Marble Cake
- 1¾ cups (220 g) all-purpose flour
- 1½ teaspoons baking powder
- ¼ teaspoon baking soda
- ½ teaspoon salt
- ½ cup (113 g) unsalted butter, softened
- ¾ cup (150 g) granulated sugar
- ¼ cup (50 g) light brown sugar
- 2 large eggs, room temperature
- 2 teaspoons pure vanilla extract
- ½ cup (120 g) sour cream, room temperature
- ⅓ cup (80 ml) whole milk, room temperature
- 3 tablespoons (18 g) unsweetened cocoa powder
- 2 tablespoons hot milk
For the Chocolate Frosting
- 4 oz (115 g) semi-sweet chocolate, finely chopped
- ⅓ cup (80 ml) heavy cream
- 1 tablespoon unsalted butter
- ½ teaspoon vanilla extract
- Small pinch of salt
Instructions
1. Prepare the pan
Preheat the oven to 350°F (175°C).
Grease a 9 × 5-inch loaf pan and line it with parchment paper, leaving some parchment hanging over the sides. This will make the cake easier to remove.
2. Combine the dry ingredients
In a medium bowl, whisk together the flour, baking powder, baking soda, and salt.
Set aside.
3. Cream the butter and sugar
In a large bowl, beat the softened butter, granulated sugar, and brown sugar for about 2–3 minutes, until lighter and creamy.
Don’t rush this step. Properly creamed butter helps give the loaf a soft texture.
4. Add the eggs
Add the eggs one at a time, beating well after each addition.
Mix in the vanilla.
Scrape down the sides and bottom of the bowl when necessary.
5. Add the sour cream
Mix in the sour cream until just combined.
The batter may look slightly uneven at this stage; that’s fine.
6. Finish the vanilla batter
Add approximately one-third of the dry ingredients and mix on low speed.
Add half of the milk.
Continue alternating the dry ingredients and milk, ending with the dry ingredients.
Mix only until you no longer see streaks of flour. Do not overmix.
7. Make the chocolate batter
Transfer approximately one-third of the vanilla batter to another bowl.
In a small bowl, mix the cocoa powder with 2 tablespoons of hot milk until smooth.
Fold this chocolate mixture into the reserved batter until evenly combined.
This method gives you a chocolate batter without making it noticeably drier than the vanilla batter.
8. Create the marble effect
Spoon alternating portions of vanilla and chocolate batter into the prepared loaf pan.
Don’t try to make the layers perfect.
Once all the batter is in the pan, insert a butter knife or skewer and make approximately 3–4 large figure-eight movements through the batter.
Stop there.
Too much swirling will blend the batters together instead of creating distinct chocolate and vanilla patterns.
9. Bake
Bake for 50–60 minutes.
Begin checking at around 48–50 minutes. Insert a toothpick into the center; it should come out clean or with a few moist crumbs attached, but not wet batter.
If the top is browning too quickly before the center is done, loosely cover the loaf with aluminum foil.
10. Cool
Allow the cake to cool in the pan for approximately 15 minutes.
Use the parchment to lift it from the pan and transfer it to a wire rack.
Let the cake cool completely before frosting.
This is important. Frosting a warm cake will cause the chocolate topping to melt and run off.
Make the Chocolate Frosting
11. Heat the cream
Place the finely chopped chocolate in a heatproof bowl.
Heat the heavy cream until hot and steaming but do not boil it.
Pour it over the chocolate.
Leave untouched for about 2 minutes.
12. Finish the frosting
Stir slowly from the center outward until the chocolate is completely melted and smooth.
Add the butter, vanilla, and a small pinch of salt.
Stir until combined.
Allow the frosting to cool for approximately 15–25 minutes, or until it becomes thick enough to spread.
13. Frost the marble cake
Spoon the chocolate frosting generously over the completely cooled loaf.
Use the back of a spoon or a small spatula to spread it across the top.
For the homemade appearance in your photo, don’t smooth it perfectly. Make a few irregular swirls and peaks and allow a little frosting to reach the edges.
Let the frosting set slightly before slicing.
Tips for the Best Marble Cake
Use room-temperature ingredients. Butter, eggs, sour cream, and milk combine much more evenly when they’re not refrigerator-cold.
Don’t overmix the batter. Once you add the flour, mix only until incorporated. Overmixing can make a loaf cake dense.
Don’t add cocoa directly to dry batter. Mixing the cocoa with a little hot milk first helps maintain a similar consistency between the chocolate and vanilla batters.
Don’t overswirl. Three or four deliberate swirls are enough. The more you swirl, the less distinct the marble pattern becomes.
Let the cake cool completely. This gives you cleaner slices and keeps the chocolate frosting thick.
How to Get Beautiful Marble Swirls
The secret isn’t creating a perfect pattern before baking.
Add irregular spoonfuls of vanilla and chocolate batter throughout the loaf pan, including some chocolate batter near the edges.
Then make only a few passes with your knife.
When sliced, every piece will reveal a slightly different pattern — exactly what makes a marble cake look homemade.
Variations
Marble Cake Without Frosting
Skip the chocolate frosting and dust the cooled cake lightly with powdered sugar.
Dark Chocolate Marble Cake
Use Dutch-process cocoa and dark chocolate for a deeper chocolate flavor.
Chocolate Chip Marble Cake
Fold ½ cup mini chocolate chips into the finished batter before creating the swirls.
Orange Chocolate Marble Cake
Add finely grated orange zest to the vanilla batter. Chocolate and orange work beautifully together.
Coffee Chocolate Marble Cake
Replace the hot milk mixed with the cocoa with hot espresso for a subtle mocha flavor.
Storage
Store the cake covered at room temperature for up to 2 days.
For longer storage, refrigerate it in an airtight container for up to 5 days. Bring individual slices to room temperature before serving for the softest texture.
Can You Freeze Marble Cake?
Yes. For the best result, freeze the cake before adding the frosting.
Wrap the completely cooled loaf tightly in plastic wrap and then aluminum foil. Freeze for up to 2 months.
Thaw overnight, then add the chocolate frosting before serving.
Frequently Asked Questions
Why is my marble cake dry?
The most common causes are too much flour or overbaking. Measuring flour by weight is the most reliable method, and you should remove the cake once a toothpick comes out with a few moist crumbs.
Why did my chocolate and vanilla batters completely mix together?
You probably swirled them too much. Only a few large movements with a knife are needed.
Can I use Greek yogurt instead of sour cream?
Yes. Plain full-fat Greek yogurt can replace the sour cream in equal amounts.
Can I make this cake without a mixer?
Yes. Make sure the butter is very soft and cream it thoroughly with the sugars using a sturdy whisk or wooden spoon.
Can I make the cake a day ahead?
Absolutely. Marble cake is excellent the next day. Let it cool completely, cover it well, and add the frosting either the same day or before serving.
Conclusion
This Chocolate Marble Loaf Cake combines two classic flavors in one simple homemade dessert. The buttery vanilla cake is swirled with rich chocolate batter, creating a different pattern in every slice, while the creamy chocolate frosting makes the loaf feel extra special.
The best part is that it doesn’t need to look perfect. Irregular chocolate swirls, a slightly cracked loaf, crumbs around the slices, and rustic frosting are exactly what make this cake beautiful.
 Lea recipes
Leave a comment